
NepTrain Python接口与结构筛选
以安装版2.2.0实操描述符、FPS、周期键长、扰动与输入文件接口。
阅读本篇目录
本篇适合已经会用 NepTrain 短命令流程、希望自己写几行 Python 处理结构和数据的用户。使用集群安装版 NepTrain 2.2.0 / Python 3.11 / ASE 3.29.0。附件包含实算参考、可执行脚本和安装版源码入口索引。
1 先看参考,再运行自己的例子#
unzip neptrain-python-abacus-wave270*.zip
cd neptrain-python-abacus-wave270
bash run.sh
ls figures
run.sh 读取附件中的真实计算数据,打印结果并重画三张图,不提交 DFT 或重新训练。需要运行完整例子时,在新的解压目录提交:
sbatch job.slurm
squeue -u "$USER"
作业依次运行 Python 结构操作、两个 ABACUS 单点、标签转换和画图。它按 CPU 整节点规则申请资源,示例实际仅使用 8 个物理核心、8 个 MPI 进程、每进程1线程,不是56核心性能测试。只练习 Python 的用户,可在已分配的计算资源内运行 bash api.sh。完整例子会保护已有 work/api、work/abacus,重新计算请用新的工作目录。
cat analysis/API-RESULTS.json
cat analysis/neptrain-fps-selection.csv
cat installed-symbols.csv
2 NEP与SOAP描述符怎么取#
附件 api_examples.py 给出了完整可执行代码;它先通过 bootstrap 使用本项目配置,不改用户原来的 NepTrain 配置。
import bootstrap
from ase.io import read
from NepTrain.core.nep.calculator import Nep3Calculator, DescriptorCalculator

frames = read('data/test.xyz', ':')
calc = Nep3Calculator('models/round1-nep.txt')
atom_descriptors = calc.get_descriptors(frames[0])
structure_descriptor = calc.get_structure_descriptors(frames[0])
batch_descriptors = calc.get_structures_descriptors(frames)
energy, forces, mean_virial = calc.calculate(frames)
本例8个自有 Si₂/Si₈参考结构得到 8×30结构描述符,第一个 Si₂ 为 2×30原子描述符;结构描述符是该结构原子描述符的平均。描述符没有能量或长度的物理单位,也不能直接当成预测误差或不确定度。
soap = DescriptorCalculator(
    'soap', species=['Si'], r_cut=4.5,
    n_max=2, l_max=2, periodic=True, sparse=False,
)
soap_descriptors = soap.get_structures_descriptors(frames)
这里SOAP得到 8×9;特征数随 species、n_max、l_max 等设置变化,不能拿SOAP与NEP的坐标直接混合计算距离。DescriptorCalculator('nep', model_file=...) 则包装同一NEP描述符接口。
3 混合原子数与virial#
不同结构原子数不同时,forces 是逐结构的列表。本安装版 mean_virial 为每原子 eV;得到总virial与压力的方式如下:
import numpy as np

W = np.asarray(mean_virial[0]).reshape(3, 3) * len(frames[0])
pressure_GPa = W / frames[0].get_volume() * 160.21766208
ase_stress = -W / frames[0].get_volume()
_, _, atomic_virial = calc.calculate(frames, mean_virial=False)
atomic_virial[0] 按原子求和也应得到相同总量。压缩为正的压力与ASE应力符号相反。需要整理展平的数组时,安装版还提供:
from NepTrain.core.nep.calculator import split_by_natoms, aggregate_per_atom_to_structure

natoms = [len(a) for a in frames]
flat_forces = np.concatenate(forces)
force_blocks = split_by_natoms(flat_forces, natoms)
force_sums = aggregate_per_atom_to_structure(
    flat_forces, natoms, map_func=np.sum, axis=0,
)
本例逐结构合力接近零;不要把一整批不同原子数结构直接 reshape 成固定 N×3。
4 已有数据之外如何再选结构#
from NepTrain.core.select.select import farthest_point_sampling

existing = batch_descriptors[:4]
candidate = batch_descriptors[4:]
indices = farthest_point_sampling(
    candidate, n_samples=3, min_dist=1e-8, selected_data=existing,
)
selected = [frames[4 + i] for i in indices]
本例已有池为四个Si₂,候选池为四个Si₈,实际按顺序选出原始帧 7、4、5。每次选择与已有池、前面已选点距离最远的候选;min_dist 是描述符距离阈值,不是Å,不代表力误差门限。高层 select_structures(train, new_atoms, calc, max_selected=3, min_distance=...) 返回选中的结构,含义相同。
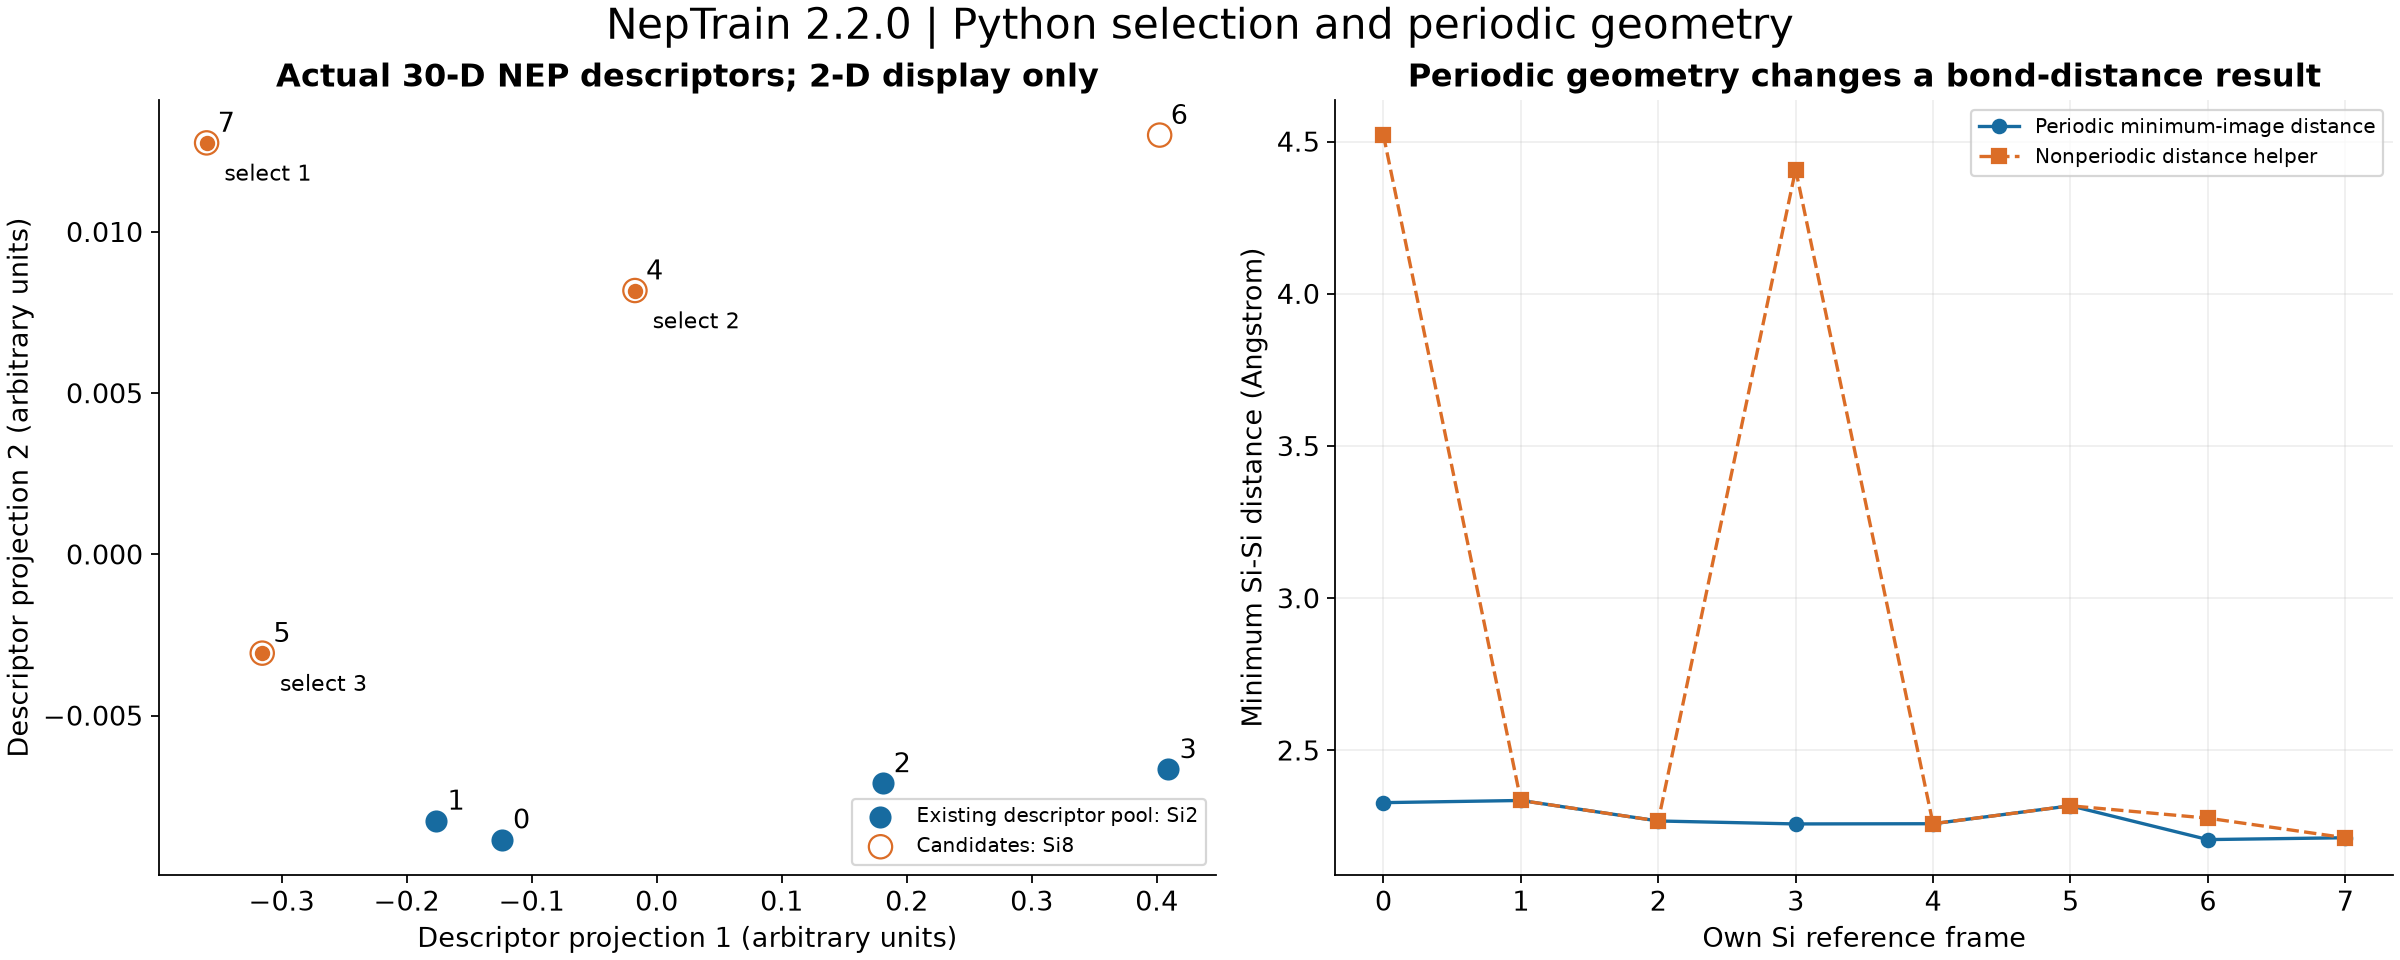
左图用降维坐标帮助观察,实际FPS仍在30维空间执行。右图表明相同几何的普通笛卡尔距离与周期最小镜像距离可能不同,不能用前者代替晶体键长。
5 周期键长与异常结构过滤#
from NepTrain.core.select.filter import (
    calculate_pairwise_distances, get_mini_distance_info,
    adjust_reasonable, parallel_filter_trajectory,
)

a = frames[0]
dist = calculate_pairwise_distances(
    a.cell.array, a.get_scaled_positions(), fractional=True,
)
print(get_mini_distance_info(a))
print(adjust_reasonable(a, coefficient=0.7))
good, rejected = parallel_filter_trajectory(frames, 0.7, n_jobs=1)
adjust_reasonable 比较实际最短键长与元素共价半径之和乘系数。系数是几何过滤参数,不是模型精度指标。本例正常结构保留;另构造0.5Å Si–Si短键作为明确的异常输入,得到拒绝结果,它不是真实MD轨迹。
安装版距离函数枚举相邻27个周期平移,适用于本例正常晶胞;极度倾斜、坐标远离基本晶胞的结构,应先规范晶胞与坐标,再与ASE get_all_distances(mic=True) 对照。另有 compute_min_bond_lengths、process_trajectory、filter_by_bonds 使用非周期距离,适合明确需要其定义的场景,不能把名称相近就当成同一个周期过滤器。
6 原子扰动、晶胞应变与MC扰动#
import numpy as np
from NepTrain.core.perturb.run import (
    perturb_position, generate_strained_structure,
    generate_deformed_structure,
)

np.random.seed(27017)
position_only = perturb_position(frames[4], min_distance=0.02)
strained = generate_strained_structure(frames[4], [-0.01, 0.01], 0.02)
deformed = generate_deformed_structure(frames[4], [-0.01, 0.01], 0.02)
这里 min_distance 这个历史参数名实际控制每个笛卡尔分量的均匀随机位移幅度,不保证生成结构的最小键长。生成候选后仍需进行上节的键长过滤,再做DFT标签。generate_strained_structure 与 generate_deformed_structure 分别施加应变/矩阵形变并叠加位移,本例另用零位移对照确认分数坐标保持。
源码还保留MC rattle辅助入口,它不是当前CLI默认扰动方式:
from NepTrain.core.perturb._hiphive import generate_mc_rattled_structures

candidates = generate_mc_rattled_structures(
    frames[4], n_structures=2, cell_pert_fraction=0.005,
    rattle_std=0.01, d_min=1.5, seed=27024, n_iter=2,
)
MC位移受邻近原子的接受概率约束,最终位移不直接等于 rattle_std。重复调用需使用不同种子以减少相关性。附件保存的 analysis/constructed-candidates.xyz 是构造候选,不是温度已平衡的动力学采样。
7 输入文件接口与全部入口索引#
from NepTrain.core.nep.io import RunInput

inp = RunInput('data/test.xyz', 'inputs/nep.in')
inp.write_run('my-nep.in')
RunInput 读取/生成训练输入,PredictionRunInput 写入预测模式;set_restart 要指向真正的 nep.restart 检查点。附件仅演示输入生成,真正的续训操作与数据见 API与检查点,不要把nep.txt改名当检查点。
| 功能 | 安装版入口与示例位置 |
|---|---|
| 8条CLI | init、perturb、select、nep、gpumd、dft、vasp、train,见原实操系列 |
| 原子/结构描述符、能量、力、virial | Nep3Calculator、DescriptorCalculator,本篇第2–3节 |
| 混合原子数数组归并 | split_by_natoms、aggregate_per_atom_to_structure,第3节 |
| FPS与结构返回 | farthest_point_sampling、select_structures,第4节 |
| 周期距离、半径过滤、单帧/批量过滤 | core.select.filter,第5节及api_examples.py |
| 非周期键长、相对参考键长过滤 | core.select.select,第5节及api_examples.py |
| 位移/应变/矩阵形变、MC rattle | core.perturb.run、core.perturb._hiphive,第6节 |
| NEP训练/预测/续训输入 | core.nep.io,api_examples.py与原续训示例 |
| GPUMD输入、温度/步数、角度/体积/采样间隔 | core.gpumd.io、core.gpumd.utils,api_examples.py |
| VASP与ABACUS标签 | 原VASP补标篇与 ABACUS标签 |
| 调度模板、工作流路径与阶段管理 | get_job_config、Manager、PathManager等,api_examples.py与原真实闭环 |
| 训练、MD与图表封装 | 原六篇实操教程,覆盖原生计算、曲线、误差、筛选、续算 |
| 环境检查、打印、文件复制、监视器等内部帮助 | installed-symbols.csv逐项列出定义位置、方法和用途 |
索引含安装版 94个顶层源码定义:早先90个非下划线同步函数/类,再加3个下划线帮助函数与1个异步函数。它是完整源码导航,不表示每一个内部名字都是稳定的用户API,也不表示PBS、云平台已经实际运行。示例具体调用了52个接口/模式,核心输出包含79项数值与几何检查。不要使用当前上游未安装版本的配置字段替代本篇2.2.0输入。
上游与安装版本资料:NepTrain 2.2.0、对应源码。